|
ZapSnap is trademark and copyright of Modular Systems, Denmark |
|
ZapSnap User Manual
Introduction
Welcome to ZapSnap version 1.0, the easy and complete screen capture solution.
ZapSnap installs itself to the Windows icon tray with minimal resource usage.
Usage at a Glance
- Use the mouse or the hotkeys to grab the screen, the active window/client area or any screen region.
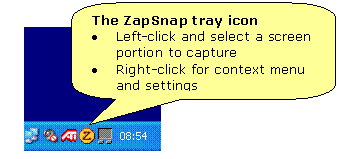
1. Left-click the ZapSnap tray icon (the circled Z displayed in the figure above)
2. Move around the mouse (the cursor now looks like a cross)
3. Click and drag to select the screen rectangle you want to capture
4. Release the mouse to save the captured rectangle
To cancel the capture, just press Escape or click the right mouse button.
- Hotkeys (Windows XP/2000 only)
Under Windows XP and 2000, ZapSnap replaces the system screen capture hotkeys: - Print Screen captures the whole screen
- Alt + Print Screen captures the active window
- Ctrl + Print Screen captures only the client area of the active window (i.e., without the window’s frame and title bar)
- ZapSnap can automatically name the captured image and save it to the location of your choice and/or to the clipboard.
- Supported formats include BMP, JPEG, GIF, PNG, ICO, TIFF, TGA and more!
- You can also instruct ZapSnap to automatically open the
image in any image-editing program of your choice, or write a command or
batch file to handle the image the way you want. Just right-click the
ZapSnap icon tray, choose the Settings command and customize ZapSnap to
your needs.
Installation
To install ZapSnap on your system, just double-click the ZapSnapSetup.exe self-extracting executable and follow the instructions.
(You can download ZapSnap directly from the Modular Systems web site at http://www.modularsystems.dk.)
At the end of the installation process, you have the options to place program shortcuts on the Windows desktop and in the system startup folder (so that ZapSnap will automatically be launched when Windows starts up).
After the installation completes, you can launch ZapSnap by double-clicking the shortcut icon on the desktop or from the Windows start menu.
A welcome screen will appear, reminding you that you can run the software for evaluation purposes only.
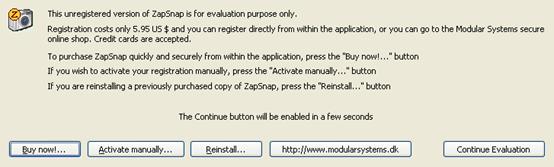
In this screen you have the option to:
[Buy now!]
Press this button to purchase and activate ZapSnap using your credit card, directly from within the program.
This is a secure, straightforward procedure powered by eSellerate e-commerce solutions.
[Activate manually…]
To manually register using the serial number obtained with a previous purchase
[Reinstall…]
This button allows you to automatically reactivate your license after a reinstallation of the software.
[http://www.modularsystems.dk]
This button will open up a browser window and visit the Modular Systems website. From the web site you can access the secure Modular System online store and purchase ZapSnap from there. Upon purchase, you will be given a registration key that you can use to activate the software manually.
[Continue Evaluation]
Press this button to close the window and continue using ZapSnap.
Usage
There is no program window associated with ZapSnap.
When the program starts, you will see the ZapSnap logo (a Z inside a yellow circle) appearing in the Windows icon tray – at the right side of the taskbar, near the system clock.
Now, click the ZapSnap tray icon with the right mouse button. This will bring up the ZapSnap context menu.
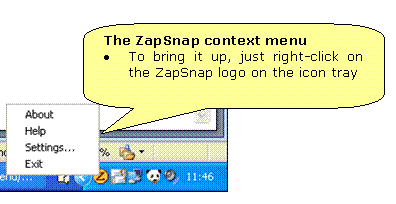
About
This option displays version and copyright information about ZapSnap. If you have purchased and activated the software, here you can see your serial number too.
If you haven’t purchased ZapSnap yet, you can start the purchase procedure from the About box.
Help
Click here to display the user manual.
Exit
Click here to quit ZapSnap.
Settings…
This menu option opens the ZapSnap settings dialog. See the next paragraph, Settings, for details.
Settings
This is the ZapSnap settings dialog. You can bring it up by selecting the Settings option from the ZapSnap context menu.
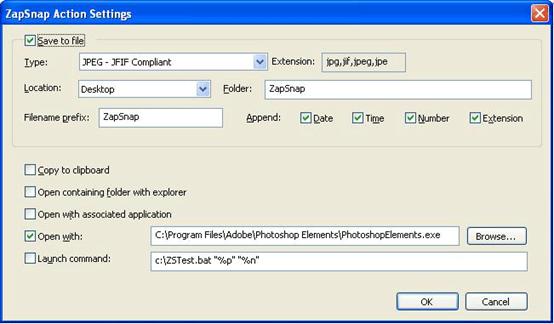
In the Settings dialog, you can choose which actions you want the program to perform with the captured image. Select one or more of the following:
Save to file
If you check this option, ZapSnap will save every captured image as a file.
File formats
ZapSnap supports the following file formats:
JPEG - Joint Photographic Experts Group Format
PNG – Portable Network Graphics
BMP – Windows Bitmap
GIF - Graphic Interchange Format
TIFF – Tagged Image File Format
TGA – Targa
ICO – Windows Icon Format
PBM – Portable Bitmap (ASCII and RAW)
PGM – Portable Greymap (ASCII and RAW)
PPM – Portable Pixelmap (ASCII and RAW)
WAP – Wireless Bitmap
X11 – X11 Pixmap Format
Location
In the Location drop down list, you can choose where you want the captured images to be saved. The alternatives are:
Absolute path (must be specified in the Folder edit box)
Desktop
My Documents
My Pictures
In all cases, you can use the Folder edit box to specify a subfolder (which is created by the program if necessary).
The default save location is a ZapSnap folder on the desktop. This folder is created the first time you capture an image using ZapSnap.
Naming Rules
You can also specify how you would like ZapSnap to automatically name your captured images. You can set a fixed prefix, and then tell the program to append date, time, a progressive number and a file extension (according to the chosen format).
Copy to clipboard
If you turn on this option, ZapSnap will copy the captured image to the Windows clipboard.
Open containing folder with Explorer
This option is enabled only if you selected the Save to file option too. It tells ZapSnap to open the directory where the images are saved.
Open with associated application
If you check this option (only available when you select the Save to file option as well) ZapSnap will automatically open the captured image with the associated application.
Open with…
This option allows you to open the captured image with any program you specify.
Launch command
This option allows you to specify a command to be launched every time ZapSnap captures an image. In the command line you can use the following parameters:
%p is replaced with the full pathname of the captured image file
%d is replaced with the directory name where the captured image file resides
%n is replaced with the file name of the captured image